DIY Self-Watering Planters Tutorial
 One of the blessings of a lifetime of gardening–even before I was Seminary Gal–has been developing little tricks for keeping my garden looking nice. Enjoy these hacks for a million dollar garden at a budget price. How many of us want self-watering planters, but don’t want the wallet-draining prices that come with them? Today, you can learn to make your own self-watering planters, followed by 4 other quick hacks.
For the self-watering planters, first you’ll need to throw a party and serve wine.
You’ll need empty wine bottles and drinking alone is never a good idea.
* * *
Besides, any craft that starts with “throw a party and serve wine” must be good, right?
* * *
Supplies needed:
- empty wine bottle, no cork needed
- unglazed clay pot with or without a hole.
- a plastic lid that fits the pot
- a empty yogurt cup
- a hot glue gun or outdoor adhesive
- a permanent marker
- scissors or a craft knife
- spray paint
- Make sure you’re sober before using the hot glue gun, permanent marker, or the knife. If you didn’t throw a party and skipped that step, deciding to drink alone against the advice of Seminary Gal, just making sure you’re ok to proceed. Don’t make me say “I told you so!”
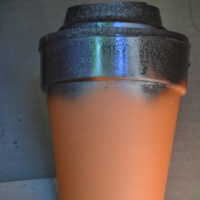
- Using the permanent marker, mark pie shaped pieces as an asterisk formation on the reverse side of the plastic lid to make cutting lines (visible in photo above).
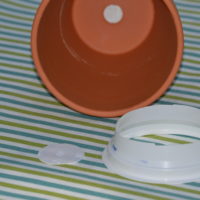 Cut the lid on the asterisk lines and also cut the bottom off the yogurt cup to give it a 1 inch height. It should look like a ring.
- Save the bottom part removed for the next step.
- Take the clay pot and if it has a hole you will need to cover it with a disc of plastic. Hey, you have the bottom of the yogurt cup and if you’re following directions, you’ll still have it!
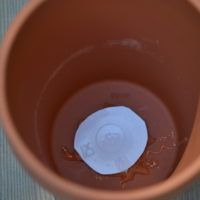 Using the hot glue gun VERY HOT, squirt some glue around the opening of the hole. Gently and carefully press the disk down with the permanent marker so you don’t burn your fingers. Are you paying attention here? Friends don’t let friends get burned. It’s why I’m not just a gardener but an evangelist. I can tell you more if you want…
- Put the pot aside and squirt a ring of hot glue (VERY HOT STILL) around the plastic lid where the inverted cup will rest. Don’t touch the glue. Of course, if you’re using an outdoor adhesive, follow those label directions to do both steps 6 and 7 and then rejoin me after the glue has cured. Hot glue and duct tape are amazing–they can solve the world’s problems. Well, all but one and that’s why I am also an evangelist, but I already said that, didn’t I?
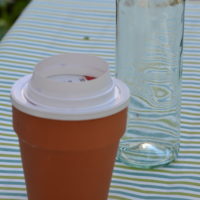 So now you have the two pieces which will fit together. It’s like Garanimals or that card game you played when you were a kid. Match them up by putting the ring lid on the closed hole pot.
- You could theoretically put it in the planter just like this, but I prefer to paint mine for three reasons. First, it’s much more attractive, (2) it blends in a little better, and (3) it actually seals the top of the clay pot to keep it from wicking moisture to the air. And we’re not looking to increase the humidity (particularly in an Illinois summer) we’re looking to water plants. Therefore, spray paint only the part that will be
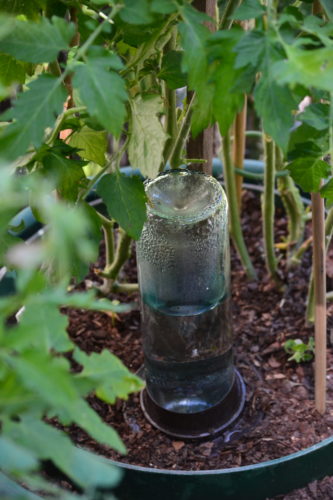
 above the soil line in the planter. The lower part of the pot must remain clay (which is porous) so the water will flow slowly into the soil.
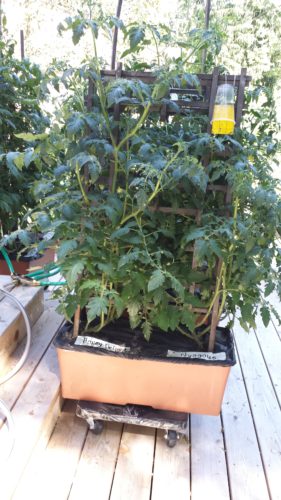
 - You’re at the last step, bury it to the lid level, fill the pot with water, fill the wine bottle with water, and invert the wine bottle into the asterisk ring stand. Depending on how big the planter is and much your plant uses, you may need to fill every couple of days. Keeping tomatoes in pots requires even moisture to avoid the fruit condition called blossom end rot, so I make sure my bottle is always filled.
See? Self-watering planters in 10 easy steps.
 The other hacks are even easier.
Rolling Planters: Why pay an arm and a leg for wheels for Earth boxes and deck planters or the equal sin of having the planters ruin your deck with constant moisture and the inevitable rings from contact? I’m using furniture trolleys from my local hardware store and covered them with black plastic and duct tape. They’re much more durable than the little plastic wheels that come with these planters, they roll better, and to top that off you can roll them to follow the sun. God made you stewards of the earth and you can take authority over your deck!
 Planter Feet: It doesn’t get much easier than this one. Wooden push pins poked into the corners on the bottom of these square planters make great pot feet and keep them from staining the deck. Yes, you can use your imagination, do round containers and provided you’re older than kindergarten you know that circles don’t have corners. You can just space them around the round base of the container. Easy peasy!
Bungee Belts: I hate it when the squirrels knock my planters off the hand railing. Or a stiff breeze! Aaaargh! No more now that I have bungee belts for my herbs. Pass the bungee cord under the railing and hook one side on the back of the planter and the other on the front. You may be thinking, “It’s so easy! Why didn’t I think of it?” I can’t answer that, and maybe you did, but I put it in a post so we can both buy stock in bungee cords.
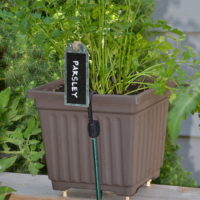
 Sticky Bells: Are not the same as sticky buns which sound really good right now. Sticky bells use a coat hanger hook, a plastic cup as an umbrella, and a whitefly sticky trap to keep those pesky white flies off my tomatoes. No chemicals and my tomatoes are healthy, healthy, healthy!
Take stewardship over your garden! It’s God’s gift to you as the top of the food chain!
Hope you enjoyed my DIY ideas for gardening. Have a party and celebrate! You’ll have saved yourself a lot of money and frustration with these self-watering planters and other nifty hacks.
Social Networks:


Leave a Reply