Winter Buddies

Winter storm “Hercules” may be dumping 15 inches of snow outside, but look what’s going on inside.  The very short day lengths, cooler temperatures, and indoor plant lights make gardening possible and some plants actually prefer it.  These “winter buddies” are budding now and will blossom shortly.

winter buddies


Many orchids bloom in the winter, among the easiest to grow is the Phalaenopsis (moth orchid) and mine are sending up stalks right and left, preparing for their January to April natural bloom season.  Soon there will be flowers all along their graceful stalks.  The cymbidum orchid pictured shows the sap secreted alongside every flower’s pedicel.  It’s part of how they grow so I am careful to have a tray below it to keep my furniture protected.

My clivia is another winter bloomer, but it is presently sitting in a cold closet waiting until its chilling units have been reached.  Then, it will send up majestic stalks of brilliant orange flowers sure to cheer any dreary day.  Some plants are daylight sensitive, others need what are called chilling units (a combination of temperature and duration) to form their flower buds.  Many spring bulbs, clivia, cymbidium orchids, and cyclamen all require chilling units to form their flower buds.

Buds and flowers have a way of encouraging us, even when facing challenging times.

In Scripture, we read about the priest Aaron (Moses’ brother) being challenged in his authority by other Israelites.  So God set up a proof of Aaron’s priestly authority.  The proof was in the budding of an almond branch–of all the proofs, it was the budding of a branch!  Each of the tribes selected an almond branch staff and then we read:

Numbers 17:1 The LORD said to Moses, 2 “Speak to the Israelites and get twelve staffs from them, one from the leader of each of their ancestral tribes. Write the name of each man on his staff. 3 On the staff of Levi write Aaron’s name, for there must be one staff for the head of each ancestral tribe. 4 Place them in the Tent of Meeting in front of the Testimony, where I meet with you. 5 The staff belonging to the man I choose will sprout, and I will rid myself of this constant grumbling against you by the Israelites.” 6 So Moses spoke to the Israelites, and their leaders gave him twelve staffs, one for the leader of each of their ancestral tribes, and Aaron’s staff was among them. 7 Moses placed the staffs before the LORD in the Tent of the Testimony. 8 The next day Moses entered the Tent of the Testimony and saw that Aaron’s staff, which represented the house of Levi, had not only sprouted but had budded, blossomed and produced almonds.

God goes over the top because not only had the staff sprouted, but it blossomed and produced almonds!  Eventually Aaron’s staff–proof of his priestly authority–was kept in the ark of the covenant along with the gold jar of manna and the stone tablets of the covenant.

Budding, blossoming, and fruiting are but a few ways God reminds us of His faithfulness, His sovereign control over nature, and His abundant blessing.

Continue Reading

Critters in the Garden Part 1: Insects Eating Plants

It’s been a while since I wrote a gardening post.  My excuse? Aside from being busy writing other posts,  the truth is: I’ve been doing battle with critters, both animals and insects.

deer at the door w maskI knew I’d had enough when the deer was standing on my front porch eating a pot of tulips.  I thought I was safe only treating the plants in the gardens.  Now I’m starting to get concerned about the flowers on my kitchen table.  Next thing you know, the deer will be wearing ski masks, ringing the front doorbell, and telling me,

Hand over the good stuff and no one will get hurt!”

Good gardens attract many critters.  Some we’re happy to see.  Some are unwanted vandals and decimators of plant material.  Here are a few critters from the yard and solutions to them.  In Part 1, we’ll look at Insects, not that we want to see them.

Insects

Treatment of insects will largely depend on how “organic” you want to be and what type of plant material you’re protecting.  Taking more organic approaches will be wise with foods you’re growing.

Organic Approaches
  • You can use pieces of flat moist wood, lay them on the garden soil and daily scrape or stomp the earwigs, pill bugs, and other insects that hide in such places.  Slugs (while not an insect) can also be eliminated in this way.  Earwigs will also hide under pots on your deck.  Lifting the pots and crushing the runaway earwigs is a good daily practice because it reduces their numbers.   I feel guilty removing caterpillars from leaves and flowers, knowing that some are from butterflies, but I can try to relocate them to other plants I don’t care about instead of killing them if I know that they are from butterflies.  Tomato horn caterpillars are no friend and they meet their Maker.
  • You can reuse plastic-lidded trays like you sometimes get with Chinese food or deeper ones like you get in the lunchmeat section, cutting small holes to make openings for insects (and slugs) to crawl into a layer of beer.  The scent of beer actually attracts them.  Bury it slightly in the ground to keep it from blowing away and to make it easier for the insects to get in.  You’ll need to empty it quite often.
  • A cup of soapy water works well for Japanese beetle scouts and earwigs and other leaf/flower-eating insects.  Hand removal of pests is a tedious but good choice for organic gardeners.
  • Yellow sticky traps are great for flying insects like whitefly that love tomatoes.
  • Japanese beetle traps work really well, but it’s IMPORTANT to locate them far away from the gardens you wish to protect.  Otherwise you’re just inviting more to come devour your ornamentals.
  • Diatomaceous earth (crushed shell product) is great for killing a variety of crawling insects and slugs, however, the white powder is not attractive for curb appeal.
  • There are also natural alternatives like parasitic wasps (that kill caterpillars), insects that love to eat aphids (such as lady bugs and praying mantises), and Bacillus thuringiensis also known as Bt which is a bacteria that is completely harmless to non-target insects (like honeybees), birds and other wildlife, but is quite toxic to caterpillars, webworms, and leaf rollers, etc.
Chemicals

While I’m not a chemical person by nature, there are times chemicals are the better alternative.  I use chemicals on my roses and other prized ornamentals that will be decimated by insects.  Generally speaking, I prefer ones I incorporate into the soil immediately around the plant than ones sprayed, particularly when I’m dealing with small areas of flat terrain.  The reason is this: A systemic insecticide will kill only insects that eat the plants.  Sprays are—as a rule—more indiscriminate than systemics.  Sprays kill friendly insects like honey bees, praying mantises, and lady bugs every bit as easily as they kill dreaded pests.  I personally avoid sprays if I can help it.

Bayer makes a nice selection of soil-incorporated products that are systemic.  I use them on my roses and my gardenia and some non-flowering ornamentals.

The jury is still out regarding whether the chemicals enter the nectar that is eaten by honey bees and hummingbirds.  The company says it’s safe and I know that chemical companies need to go through many levels of testing to get approval for production and marketing of garden chemicals.  However, I will say that I have a special place in my heart for honey bees and am greatly concerned about their decline in numbers.  I do what I can to make sure they are protected.  Therefore, flowers that I know honey bees like (coleus and snapdragon flowers, for example) won’t get treated with a systemic or a spray.  I will try to find other alternatives among the organic group, particularly until I find that honey bees don’t like the plant.

One way that I am content to do sprays is as a barrier treatment.  So, for example, I have been known to spray a band around the pot with a contact insecticide.  As the earwigs try to get to the plant, they will cross the barrier and die.  By carefully doing the spraying on windless mornings or evenings, I can give the spray a chance to dry and avoid drift all at the same time, all of which are done to minimize damage done to insects that are not problems.

Physical Barriers

I have been known to use physical barriers as well although I have had less cause to use them in recent years.  For a few years, I participated in the County Fair through our garden club and wanted to have “show quality” blossoms and fruit.  Physical barriers can include netting, collars, plastic mulches, raised platforms, trellises, and sticky traps.

Overall, using an Integrated Pest Management Approach is probably the most environmentally conscious approach, reflecting the kind of wise stewardship that God gave to mankind as we “rule over” Creation.

Continue Reading

Winter’s Grip is Letting Go

I don’t really care what the forecasters might say.  Winter’s Grip is Letting Go.  The day length is increasing and the trees know it.  The birds know it, too.  It won’t be long before winter is replaced by the season of singing.

See! The winter is past; the rains are over and gone. Flowers appear on the earth; the season of singing has come, the cooing of doves is heard in our land.  (Song of Solomon 2:11-12)

As I was celebrating the morning by watching another spectacular sunrise, I noticed something that only a horticulturist would notice.  Compared to sunrises a month ago, the lengthening days are encouraging the buds on the trees to begin swelling.  Within the next 2-3 weeks, the sap will begin running, maple syruping season will start, and the parade of early spring bloomers will appear.  Be encouraged.  Winter’s Grip is Letting Go.

Continue Reading

Too Late to Plant Fall Bulbs?

Put your question and your shame to rest.  So, you’ve procrastinated like many gardeners.  I’ve done it too.  I’m pretty certain that among gardeners, we all sin and fall short of the calendar for planting fall bulbs at some point in our lives.  Now the ground is approaching frozen and you ask,

Is it too late to plant fall bulbs?

The answer is “Yes”…sort of.  Once the ground is frozen, the bulbs won’t have time to root or to enter their winter rest in the normal way.

But also “No”–I never let the rules of nature foil my attempts to recover with grace Redemption for your procrastination is indeed possible!  Here are two techniques for dealing with those bags of bulbs that seemed so enticing at the store in September and now haunt your life as an October opportunity lost.

Technique 1: Pot them up.  I do this by choice every year.  There is no excuse for letting those bags of bulbs taunt you, reminding you of your high hopes and lackluster planting performance.  I choose a pot that’s about a foot deep and large enough to accommodate a dozen or so bulbs.  Break the rules about spacing that appear on the bag.  If you’re going to break gardening rules, go big!  One of the rare instances I’d advocate such a thing is in the area of gardening!

I place about 6 inches of soil in the bottom of a pot and put bone meal or Holland Bulb Booster on top.  Then I add another 2 inches of soil and mix it well.  Then I place the bulbs… (tulips with flat side toward the edge of the pot)…on top of the soil and then cover it with soil up to approximately one inch of the surface.  Why the flat side, you ask?  That way the leaves that emerge will gracefully arch over the outside edge and the flowers will be more upright and visible.  True confession: I have been known to mix a few different kinds of bulbs to have an extended bloom time.  I water the pots and place them in our unheated garage named Arkansas.  Because Arkansas is unheated, the bulbs will have sufficient chilling to root first and then form their flowers deep inside the bulbs.  And there they sit for weeks of growing underground and just plain chillin’.

Can’t I just put the bags of bulbs in the basement and plant them in the spring, you ask?

No way, posey!  Storing bags of bulbs in the basement ignores that bulbs breathe and live throughout the winter during which the bulb will exhaust its food supply.  When you go to plant it, the shell of a former bulb will gasp and give up its ghost.  Don’t do it!  Instead, pot them up and roots will form, drawing both moisture and nutrients to feed the bulb.  In the spring you’ll have a lovely display that looks like this (right).  My garden by the mailbox has two pots like this each spring.

Technique 2: Give them a cold treatment for forcing in water or soil.  If you have a dark, cold place to chill them, they can be brought out of chilling in the late winter for beauty indoors.  Some people like to put theirs in their refrigerator.  Of course, I like to cook as well as garden and I do not have enough room in my refrigerator for bulbs among a bazillion leftovers.  Plus, there’s the issue of ethylene gas produced by ripening fruits and vegetables which will stunt, deform, or otherwise inhibit flowers.  What good is that?  Isn’t that what everyone wants:  a bunch of bulbs in the refrigerator all winter and nothing to show for it in the spring?  Not me.  I like my garage with the bulbs in paper grocery bags.  Just keep them from freezing!


Different bulbs require different amounts of chilling.

Flower Bulb Type

Chilling Time

(approx. weeks at 40 degrees)

Crocus

14

Daffodil

16

Hyacinth

12

Snowdrop

14

Tulip

16


I particularly like hyacinths because they can be forced in special vases that suspend the chilled bulb above the surface of water for a delightful burst of spring fragrance.  Low dishes with decorative stones are also nice, but the weight of the flower will typically topple it out of the low dishes.  Of course, you can also plant the already chilled bulbs in pots to plop in the ground in the spring too!

One final note:  Not all bulbs require chilling.  Paperwhites (which have a fragrance that is both loved and reviled, not by the same people) and amaryllis need no chilling at all.  They’re ready for action right out of the package.

So now you can recover with grace and lift your head from the shame of buying more bulbs than you had the energy, time, or initiative to plant in the early fall.  You no longer have to consign your bulbs to the Halloween graveyard of forgotten bulbs.  You can chill them and raise them to beauty in the spring…indoors and out!

Continue Reading

How to Overwinter Tree Roses

Roses are among the most beloved plants.  Matchless for their variety of colors and fragrance and forms, roses have a beauty that makes their persnickety nature part of their charm.  Roses need special pruning and fertilizing and insect prevention, but they also need strict attention to their fall and winter care. (Please note update at the end 5.3.2013)

Last year, I took some photos as I was preparing to overwinter my rose.  My ‘Double Delight’ tree rose is even more demanding with regard to its care than bush roses I also grow in pots.

Here is how I overwinter my tree rose:

Step 1:  Cease fertilizing roses 2 months before overwintering.  The first killing frosts in my area are mid-October so an August 15th deadline gives two full months for my roses to wind down and become convinced that it’s really OK with me for them to go dormant for the winter.

Roses, for all their complicated care, have a strong desire to grow even into the frosts.  No fertilizer, no pruning, and full exposure to cold temperatures/frosts tell them that they need to rest now.  While they’re in their two-month cool down, I dig a trench in my compost pile (which is more like a pile of leaves than a true compost pile).  The trench will need to be big enough to accommodate the tree rose laying on its side and whatever other roses I’ve been growing in pots.

Step 2:  Once the hard frosts have hit a time or two, I can safely prune them.  The leaves and flowers often have a dull purplish tone to them showing that they have been exposed to sufficient cold.  Roses already know it’s time to shut down for the season, so when I prune them for the winter’s covering, they just accept it and don’t rebel against it by trying to grow some more.  They are obedient roses.  Tree roses get pruned differently than a bush rose so my photos will demonstrate their winter care.

All non-landscape roses have a “graft union” (place where the pretty rose variety was plugged into the sturdy root stock).  For bush roses, it is located at the ground level and this graft union can be covered with soil or mulch.  I’m particular to pine bark mini-nuggets because they still pour when frozen and stay put during the winter.  The added benefit is the way they become part of the spring/summer mulch when I wash them away from the graft union.

Tree roses are different.  A standard form or tree rose has a root zone, a tall stalk that’s part of the rootstock, and the graft union is at the top of the root stock.  Since the graft union is what needs protecting, covering the roots with mulch does no good whatsoever for preserving the graft union.

The knotty looking section with stems coming out is called the graft union.  With bush roses, I’m content to leave the canes about 12-18 inches long.  Not so with tree roses.  I clip them back to about 3 inches from the graft union.  Otherwise the new growth in the spring will be long and so heavy that the weak juncture will break off easily.  So I try to keep the spring growth compact.  It begins in the fall as I cut away the dead canes completely and the green canes get clipped to approximately 3 inches in length.  I use sharp pruning shears that have been treated with bleach so I don’t contaminate the rose for its winter rest.


Step 3:  Once it is pruned, it looks very naked, I know.  But it will have less to try to maintain through the winter.  It may sound strange, but plants stay alive through the winter even as they are dormant.  If you have a large plant to try to keep alive, it will expend more of its stored food trying to keep it all alive…and it may end up killing the whole plant in the process.

You’ll notice I removed all the leaves which–at this point–will only be a source of disease inoculum for next year.  Even so, there may be some organisms on the canes, so I usually do one last spray of insecticide before wrapping it up.


Step 4:  Wrapping the rose for winter storage (left).

While I could just bury the rose in its pot, I prefer to take it out of the pot so rain and melting snow can keep the root zone hydrated.  Both the roots and the graft union need to be protected and with a long stalk, it risks being broken in addition to frozen.  Therefore, I take the extra step of wrapping it in frost cloth.  Both air and water can permeate it, but the rose will stay substantially cleaner and will make it less attractive for mice than if it were just buried among all the leaves.  Furthermore, wrapping the whole rose in frost cloth helps to make its removal in the spring less likely to break anything, whether the stalk or the graft union/new buds.


Step 5: Cover the wrapped tree rose in the trench with leaves.  Of course, the trench I’ve already prepared in the back and the neatly wrapped rose don’t look too good in the photo with both roots and graft union ready to be covered.  Should the police wonder what I’m burying, we could always open it to reveal nothing but the rose inside.  Last year my son had a few laughs at my expense as we went out and buried it.  But, I got the last laugh this spring when I unearthed it.


Step 6:  In the early spring, I unearth my tree rose and place it in a sheltered spot.  If it’s too cold outside still, I’ll put it in the garage.  I don’t want to leave it in the compost pile and have the leaf buds begin to “break” in the dark.  But I also don’t want to have gone through significant effort to overwinter it only to have it zapped by a late winter cold snap.  Unearthing it while it’s still dormant will allow it to develop naturally as the weather improves.  I pot it up, water it, and as the daylengths increase and the buds swell and break, I begin to fertilize it again.

My “Double Delight” tree rose began to experience bud break soon after unearthing/repotting it and it produced blossoms that were absolutely stunning this year.  By way of note, the stalk will not get taller.  The height you buy it is the height the standard (stalk portion) will remain.  The growth will be in the canes that arise from the graft union.  Bush roses can be grown in pots and overwintered the same way or planted in the ground (in their frost-proof pots) for the winter.  Landscape roses such as “Carefree Wonder”, many rugosa roses, “The Fairy”, drift or “Knockout” roses do not need this special care since they are hardier and not grown as grafted plants.  If you love roses but hate the maintenance, these “own root roses” are good options to try.

But for those of us who desire tree roses, we don’t mind that they are higher maintenance plants.  These jewels among jewels of the garden are well worth the extra care they require.   There is something marvelous about a reward of such beauty after a long labor of love.  It’s kind of a nice reflection in nature of the same beauty and reward of the Christian life well-lived. 


==== Important update (5.3.2013) For the first time in the decade I’ve been overwintering my roses this way, this year my roses were eaten by voles (a type of mouse).  Each of them looked like they had been put in an electric pencil sharpener and gnawed to a point.  I am attempting to root them (since there was remaining root stock below the graft union).  I’m not sure how well that will work since the bark appears to have been stripped all the way to the cambial layer, but I’ll keep you updated.

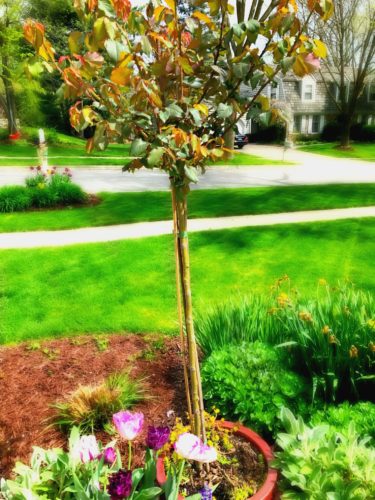
(2013) So this year when I overwinter my roses, it will include using hardware cloth (wire mesh with 1/4″ holes) to keep the voles from breaking my heart again next year.   As I wrap them in hardware cloth, I’ll include photos of that too.

That was ineffective as the voles found their way in, so last winter (2016-2017) I kept it in the garage.  I watered it periodically with cold water and kept the lights on in the garage to provide a little heat on the coldest of nights.  The result was a resounding success.  Cutting it back just as shown in the earlier photos, I placed it outside after danger of frost (putting it on the front porch tucked next to the house, if frost threatens).  Here is how it turned out.  It will be spectacular when it blooms.  I also did some containerized bush roses that way and they’re every bit as ready to burst into bloom! 
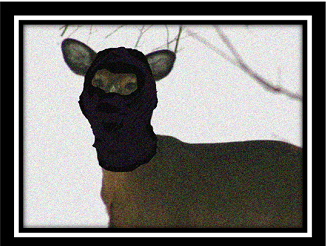
 

Continue Reading

What to Do About Hydrangeas?

Hydrangeas can be confusing at nearly every season.   Fall confusion produces as many questions as spring confusion.

In the fall, people in the northern United States look at their hydrangeas and wonder, “Now what?”

Winter is coming. 

Do I cut my hydrangeas back? 

Do I let them go just as they are? 

Everyone has advice.  I’ll offer you mine and also point you to some really excellent web sites on hydrangeas (look for the links).

Most of the confusion can be resolved by knowing which hydrangea you have and where you live (check this hardiness zone map).  One web site that has a nice, easy-to-understand description has a Hydrangea Identification page.  It will help you to discern whether or not yours is:

    1. a big leaf (H. macrophylla, also called Mophead or Lace Cap) which is commonly offered in various blue and pink forms and often can be color changed by altering soil pH.
    2. oakleaf (H. quercifolia) which is native to the southeastern US,
    3. Peegee (H. paniculata) which is native to Japan/China and has flowers that are elongated panicles rather than rounded,  or
    4. Annabelle’ type (H. arborescens) which have the large white ball-like flowers.  ‘Annabelle’ is the most famous of this class of hydrangea.

You’ll notice I listed them all as H. (which stands for Hydrangea) and then a different name second.  That’s because like a family all has the same last name and your first name distinguishes who in your family is being discussed, so the Latin second name refers to a specific species within a genus (the name Hydrangea).  How you care for hydrangeas depends on how hardy yours is and whether it characteristically blooms on old wood (last year’s growth) or new wood (current year’s growth).  In any case, I stop all fertilizing of hydrangeas and roses after August 15th to convince these plants to enter dormancy.

Among the ones that bloom on new wood are Endless Summer,  H. paniculata such as Limelight, and H. arborescens “Annabelle”.  Because these bloom on new wood, the current season’s growth, they can be pruned at any time, although late fall (after a few hard frosts) ensures they won’t try to continue putting out new growth and instead will enter dormancy.  Endless Summer will produce better/ more profuse blossoms if the spent flowers are removed.  If your Endless Summer are still smaller in size, you can just let them go through the winter, no pruning needed at all.  If yours are larger, you can prune them back, but it’s not necessary.  The grower has a nice winter care guide.    “Annabelle” is prized for its large white blossoms, but it can be cut down severely in the fall which helps it to maintain a better shape and sturdier habit for the following year (unless you prefer your Annabelle flowers bent over into your mulch, but frankly she deserves better than facedown in the dirt).

Old wood:  most of the other macrophylla (big leaf) and quercifolia (oak leaf) types must be pruned immediately after flowering as by fall, they’ve set their flower buds.  Lilacs, azaleas, rhododendrons, and many viburnums do the same thing.  Pruning these in the fall will cut off all the flower buds.  So how do I overwinter my macrophylla “Nikko Blue” and some so-called Color Change that aren’t actually hardy in my area?  I bought all of these knowing that they are marginally hardy and would die back down to their roots in Chicagoland.  I brought back my “Nikko Blue” from New Jersey many years ago as a sentimental family favorite and my “Color Change” were a carryover from some pots I’d planted at church.  I couldn’t bear to throw them out when I switched the pots to mums and winter evergreens and decided to give these hydrangeas a whirl in my garden.  The first year in the ground neither of these bloomed because they died too far back in the winter.  While hydrangea foliage is attractive enough, it misses the whole point of the beauty of the flowers!  I learned my lesson so now…

This is how I overwinter my marginally hardy macrophyllas:


Step 1:  I stake the area around my hydgrangea while the ground is not frozen (left).  But covering hydrangeas before they go dormant doesn’t help them.  Make sure that there have been a few hard frosts before continuing.


Step 2:  I surround my plant with rabbit fencing to create a corral (right) and begin to place the last of the fall leaves around the base of the plant as we get hard frosts.


Step 3:  I slowly and gently pile leaves from the center out to the tips of the plant to bend the stalks without breaking them (left).

Eventually the entire plant will be covered with a layer of leaves and I put some netting over the top to keep the leaves from blowing away during the winter.  Of course, this makes a mess for removal in the early spring time after the coldest of winter days have passed.  I remove the stakes, unwind the corral, and then the leaves used as cover slide easily from the center outward.  The leaves may be slimy and partly decomposed, but they’ve served their function of blanketing the stalks through the coldest winter days.

While this method has worked beautifully to have abundant flower buds survive a Chicagoland winter, it’s important to note that I remove the leaves before the buds “break” (start to unfurl) so that the leaves don’t rot and so the buds don’t send out tender new growth to get zapped by late frosts.  I keep my eyes on the forecast because after uncovering the bud-filled branches, I may need to cover them with frost cloth if we are due to dip below their hardiness.  Once the leaves are removed, the buds will need to adjust to the unsheltered conditions…just as they would in areas of the country where they are fully hardy.

In the spring, after I see where the strongest growth is maintained and where the deformed (damaged) buds begin, I prune the stalk into the strong growth section. This ensures that I will have the maximum number of flower buds, but not have the tips stunted by damaged growth.  It may seem like a lot of work to go through, but the reward is well worth it if you’re trying to grow certain macrophylla hydrangeas at the northern end of their hardiness.

The newer macrophylla varieties like Endless Summer have achieved great popularity because they have all the benefits of the beauty of the big leaf varieties without the hassle of overwintering.  They’re well worth the price in both beauty and hardiness.  But now, at least, you have an option to try if you’re trying to grow macrophyllas north of their normal hardiness.


Continue Reading

Late Bloomers–Saving the Best for Last

Some of my favorite plants are late bloomers.  Some of my favorite Scriptures talk about the last in equally wonderful terms.   Sometimes, I think God saves the best for last.

John 2:7 Jesus said to the servants, “Fill the jars with water”; so they filled them to the brim. 8 Then he told them, “Now draw some out and take it to the master of the banquet.” They did so, 9 and the master of the banquet tasted the water that had been turned into wine. He did not realize where it had come from, though the servants who had drawn the water knew. Then he called the bridegroom aside 10 and said, “Everyone brings out the choice wine first and then the cheaper wine after the guests have had too much to drink; but you have saved the best till now.” 11 This, the first of his miraculous signs, Jesus performed at Cana in Galilee. He thus revealed his glory, and his disciples put their faith in him.

The last of the wine made for the first of the miracles.  I don’t know whether it’s that most of my garden starts to look past its peak by October’s arrival and therefore, the late bloomers stand out.  Or maybe it’s that as fall is in full swing and I know winter’s coming will put an end to the outdoor gardening, the late bloomers have a charm about them that brings joy to the heart.  But maybe, the best is noticed more when it’s last.  Hope springs eternal, but late fall bloomers say that little gardening miracles can still happen.

Just like the spring ephemerals, the late bloomers have a special charm.  They dare to bloom in the face of the frost.  They might not last as long as some of the summer staples, but they are stunning in their season.

Here are a few of my favorites:

Aconitum (Monkshood)—Pictured on the right, Aconitum is a real showstopper displaying a brilliant cobalt blue color which is hard to come by in the perennial garden.  For those of you who are concerned about such things, particularly cat owners whose cats eat plants, this plant is poisonous.  I have this planted in a corner where its color pops in front of a serviceberry tree adorned with fall’s yellow-red leaves.  It tolerates wet soil and shady conditions, making it a real winner in my book.

Asters—Asters (left) vary significantly in height and also in flower color.  My garden features two different varieties which are among the latest to flower.  Honey bees appreciate aster flowers for this reason.

Chelone (Turtlehead)—Turtlehead (right) looks much like a tall snapdragon, but it is a perennial that tolerates wet soil and shade.  These traits make it highly desirable along with its neat habit and colorful show.  They are planted in a corner garden where their violet-red joins with blues and purples of other perennials to create a lovely harmonious look.

Chrysanthemum—Hardy chrysanthemums come in many colors and flower shapes.  Some are cushion type, some are daisy type, but they are a staple of many fall gardens.  They do tend toward being taller in the garden than they were at the garden center.  To keep a bushy habit, they are best pinched back (the tips clipped off) before the 4th of July in order not to delay their bloom.

Sedum—This versatile perennial comes in upright and creeping plant growth habits, both of which are truly lovely.  They are among the last to bloom and their flower color often deepens with the first frosts.  Bees love this plant every bit as much as asters so careful plant placement will allow you to enjoy their beauty and allow the honey bees to gather their end of season food without any unwelcome stinging.  Sedums give their best flower color and exhibit optimal plant vigor in full sun, but they will tolerate part sun and will survive (albeit as spindly growth) in nearly full shade.  I have a few divisions of “Neon” that I threw  into the edge of the woods behind my house with the intent that they decompose and they’re surviving and flowering to spite me.  It’s nice to know that while Sedum are fairly indestructible, they are versatile and beautiful too!

Sweet Autumn Clematis–Another bee-lover, this clematis (pictured left) is hardy and vigorous and produces a blizzard of blossoms in the fall.  The vines themselves are rapid growers and given plenty of room to climb, they’ll fill a trellis, arbor, or fence with rambling beauty.  I have planted them in two locations: one solo and also one interplanted along with some large flowered early summer blooming varieties so that my clematis bloom season is extended.

Japanese Anemone (right)—This is one of my most cherished of the late bloomers.  Stately and elegant, the simple beauty of Japanese Anemone makes it a delight to everyone who sees it.  Not a year goes by in which someone doesn’t ask me about this amazing white flower.  The blossoms seem to flutter like butterflies in the wind due to the wiry stalks held high above the foliage.  They are disease resistant and the pure white color goes with absolutely everything.  They laugh in the face of early frosts and their cheerful appearance brightens the bleakest of drizzly fall days.  They come in other colors, too, but in my opinion, nothing can beat the simplicity of this lovely late bloomer.

Yes, I believe that sometimes God saves the very best for last as a little glimpse of heaven–a reminder of hope to carry us through the winters of our lives. 

Continue Reading

Overwintering 101

It’s September, official My Summer Garden is Past its Prime Month.  With the decreasing amounts of sunlight and the wear and tear of the summer’s heat and typical drought/deluge watering of Illinois summers, the plants in my garden start to look a little…oh…shabby.  With the first crisp nights dropping into the 50s, I start to think about overwintering plants.

Why overwinter?  Well, these plants have a few things to say about it:

There are several different things I do to overwinter plants.

Some (like coleus, marine heliotrope, begonias, lantana, geraniums, and polka dot plants) respond well to cuttings for bringing inside.  I spray the plants with a systemic insecticide at 7 day intervals for 3 weeks while they are still outdoors so that by the time I take cuttings, I won’t be bringing any insects in with me.  I also do not spray insecticides in the house, so if it’s going to get done, it will be done outside.  Many of the cuttings root in water very easily.  I have a heating mat that I use for the cuttings of polka dot plants and geraniums (rooted in vermiculite) since it seems to help in both instances.  If I’m rooting something in either sand or vermiculite, I use rooting hormone which helps to give the cuttings a good jump start.  I haven’t bought a coleus (except to increase my collection) in years.  Easy to root.  Cheerful in my kitchen window all winter.

Some plants go into a warmer place.  I have a garage named Arkansas and a basement named Florida The Crape Myrtle goes into the garage because it’s WAY too heavy to haul down the basement stairs.  It snuggles next to the interior wall of the garage and I water it with a tiny bit of cold water periodically.  Keeping it dry and using cold water when I do water ensures it will not break dormancy.  The amazing Mandevilla vine that was a 6″ pot last year (because I’m cheap and don’t want to buy the biggest plant I can find) overwintered last year in the basement and this year it’s taller than I am and growing on an obelisk.  I will do this year what I did last year by letting it go dormant.  I kept it quite dry, in the basement near a window, with supplemental lighting.  As the day lengths begin to increase, I increased the hours of fluorescent lighting and began to water it a bit more.  When the weather got warm enough to put it outside, then fertilizing it began in earnest.  I think I’m going to try the same thing with the gloriosa lily that hasn’t been the happiest camper on the block.  It’s much better than it was last year at this time, so we’re going to give it a shot and see if it just needed to mature.

Some plants will be snuggled next to the foundation of the house.  Last year, I overwintered a river birch in a pot by covering the whole pot with frost cloth and putting it in a warm little corner outside near the chimney.  Of course, I needed to shovel snow on it periodically so that the pot could stay watered.  Again the key is to keep it from breaking dormancy before the weather improves.  I’ll try that technique again this winter since previously I’ve only been able to keep Dwarf Alberta Spruces through the winter in pots.  Last winter was unseasonably mild, but hey!  I got two years out of a tree I bought for portable shade for a hydrangea that outgrew its partly shady zone.  Definitely worth trying again!

Other plants that are semi-hardy will be treated the same way.  Crocosmia wintered well that way last winter and were an amazing show of brilliant scarlet flowers for months!  The gladiolus have been dug and will die back down to their corms.  I will tuck them in a window box buried next to the foundation and cover them with frost cloth.

The roses and the hydrangea will not be overwintered until they’ve gone completely dormant since they fight to grow until the killing frost has come a time or two.  Trying to overwinter these too soon will mean their death.  They will refuse to go dormant and chew through their stored up food or send out new growth to get zapped by the nearest cold snap.  I overwinter my potted roses in my compost pile.  I have pictures from last year and will do a separate post on overwintering these two rather particular flowering plants.  Roses, Hydrangeas are described separately (click links).

Ecclesiastes 3:1 To everything there is a season, A time for every purpose under heaven.

I just try to bend it a little.


Continue Reading

Bee-Loved

Unlike Jesus who loves all of us equally, bees love some plants more than others.

In this short post, I’d like to outline a few flowers that bees particularly love.

This is important for attracting bees, if you’re thinking of bee-keeping.  But plant placement is also important because you really don’t want these plants within 3 feet of your entry doors.  This is also helpful information for the two out of every 1000 people who are allergic to bee stings.  You will want to avoid planting these near walkways, doorways, and traffic areas of your yard.

While most of these plants are favored by butterflies and honey bees–both of which are welcome visitors to the garden, occasionally a honey bee can sting passersby instead of just sticking to its work of gathering nectar for making honey.

Some of the most bee-loved plants include:

Asclepias

(Butterfly weed)

Aster

Crocus

Echinacea (Coneflower)

Erica (Heath, Heather)

Eupatorium (Joe Pye Weed)

Helianthus (Sunflower)

Lavender

Monarda (Bee-balm)

Nepeta  (Catmint)

Sedum

I personally love seeing honey bees in my yard. 

They are much more of a rarity these days. 

Why honey bees have been disappearing is a bit of a mystery. 

It’s been happening all over the world.

Some say it’s over use of pesticides.  Some say it may be a fungus or a virus.

Some suspect electromagnetic radiation from cell phone towers.  Scientists just don’t know for sure.

I certainly don’t have an answer, but I do make it a policy not to spray or use pesticides of any type on or anywhere near the plants that I know honey bees favor.

For this reason and so many others, it helps to know which flowers are Bee-Loved.

Continue Reading

Do Those Actually Work? Earth Boxes and Hose Reels

I am a curious person and sometimes I indulge my inner skeptic by purchasing something that I’ve always wondered about, “Do those actually work?”  So often it seems there are gimmicks on TV or in the stores and they seem like a good idea, but the thrifty person in me wants to learn from someone else’s experience.

You can learn from my experiences this time around. 

I’m here to report on two products:  Earth Boxes and self-winding hose reels.

Three years ago, I bought my first Earth Box online.  I planted it with two tomatoes to grow them on the deckYes, they work.  They really work well, so the next year I bought four.  I’m growing tomato plants the size of small trees (seriously!)  and the fruit are abundant and ripening well.

What I really like best about the Earth Boxes are (1) the way the regular watering from the self-watering feature keeps the tomatoes from the stress that causes splitting of the fruit; and (2) the watering from below and the cover on top serve to keep soil-borne foliage and fruit diseases  to a minimum.  Before I pruned off some of the leafy growth (so that the fruit can develop fully), the plants looked like this (right) in a photo taken a month ago (June 2012).

If the leafy growth was allowed to continue at will, it will.  What do you get?  You will have great big plants with fruit that are acceptable in size, but some of the larger fruiting varieties might disappoint.  However, if the number of flower stalks are limited to ones occurring on primary branches, the fruit will develop faster and more fully.  It’s how I am growing Black Krim and Mortgage Lifter that are nearly ready to harvest now–and they are big, beautiful fruit.  I’ve had to rig up a staking arrangement with a trellis, but that’s only because I like the challenge of trying to make something better than what’s available commercially.  Soon, I’ll take photos of some of the harvest so you can be a believer too.

I’m absolutely sold on Earth Boxes because my deck is the sunniest part of my yard and my tomatoes love the heat and the regular water…and I love tomatoes.  So, we’re all happy.  Check the end of this post for recent photos of the plants and harvest.

I am also happy to report that I love my self-winding hose reel.  It’s one of the hose reels that automatically rewinds using water to drive the rewinding mechanism.  Placement has been key.  I have the water discharge hose placed to deep water my Japanese Maple which must feel like it won the tree-placement lottery.  It’s exceedingly happy.  I’m happy.  What can I say?  We’re a happy group these days around my house.

I like the way the brown box of my hose reel blends right in with the flower bed and almost disappears.  I don’t have a red arrow in my yard, but I thought you might find it helpful.  The only thing I needed to do to make this hose reel perfect was to install some hose guides to keep the rewinding hose from damaging my hostas.

Not all the time do I have such gardening joy to report, but I’m happy to say that the answer to the question, “Do those actually work?” when it comes to Earth Boxes and self-winding hose reels… is ….YES!


Continue Reading