How do I care for my daylilies?
It’s a common question and sometimes daylilies can seem confusing with respect to their maintenance. Hemerocallis, the daylily, is not a true lily and that fact is itself a source of confusion. To compound matters, the variability within the genus Hemerocallis is quite remarkable. Daylilies grow from fibrous root systems and will send new growth from the expanding crown as well as from the spindle-like tuberous roots. These swollen roots are storage features that enlarge to hold a reserve of food, helping the daylily to grow and spread.
Even though each flower lasts only a day, the flowers themselves come in a variety of colors and shapes. A great resource regarding daylilies is the American Hemerocallis Society and the organization has a great page of frequently asked questions about caring for daylilies.
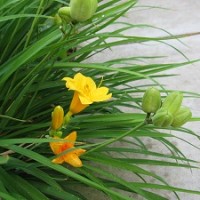
 Of the frequently asked questions I received on the sales floor, people asked how to care for their daylilies. They’d bubble with excitement at seeing a big daylily that looked like this (right).
Don’t be deceived, I’d warn them, this is almost finished with its bloom.
It was a teachable moment as I described how to remove the seed pods to extend the season of bloom to its fullest extent. If it looks like a walnut, pick it off. If it looks like a torpedo, leave it alone–it’s a flower bud. It’s a pretty memorable rule of thumb…or green thumb.
Removing seed heads, often called deadheading, is particularly important for extending the bloom season of daylilies like Stella d’Oro, Happy Returns, Just Plum Happy, etc. Removing the walnut shaped seed pods, and indeed the entire stem/stalk/scape after all the blooms of the stalk have finished will ensure that your repeat bloomers will be more likely to give you their full season’s worth of beauty. It also makes the plant more attractive than with a myriad of dead stalks waving in the breeze, proclaiming “Look at me! I’m done blooming!”
As the first flush of bloom is winding down, I become intentional about making sure it has a well balanced fertilizer with added phosphorus (a blooming plant fertilizer with a higher second number such as a 15-30-15) so that it won’t really pause too much with the heat of summer. I find my Stella d’Oro and Happy Returns want to go dormant during the hottest part of the summer, but fertilizer and plenty of moisture help to mitigate that tendency.
You can find helpful lists of extended season bloomersalthough many garden centers will carry the plants locally.
At the end of the growing season, as the frost kills the foliage, I remove all the dead leaves so that only the crown remains for the winter. Fall, before the frosts arrive, is a good time to divide and transplant daylilies although the early spring before they are fully leafed is fine as well. Once the clump is formed and leafed out, division will delay—if not prohibit—bloom and will result in a misshapen clump instead of the neatly rounded clumps that form naturally. Some daylilies, particularly the one growing wild in parts of the Midwestern United States, can be rather invasive so careful location and planning–while always wise–becomes imperative.
Daylilies are a remarkable group of plants and are easy to grow, faithful to bloom, and can tolerate a wide variety of conditions. It’s why daylilies have been a staple of every flower garden I’ve ever had.